Showing posts with label unit 31. Show all posts

Friday, 6 June 2014

Mastering.

EP - 01. Beautiful Thinking (Feat. Danilo Ferreira & Arowstarh)
I was given a harder task when mastering this because this track was already mastered and limited, so I had to re-master it again.
There was a lot of bass on the kicks so I had to take some off it off by using the EQ. I took of about 52Hz, I added a high pass filter.
I then used a multiprocessor to get rid of the spikes that was on the actual audio file, the area I compressed a little was around 3.5k this helped reduced some of the area that was at 3.5k and it also reduced the spikes. However I was not able to reduce one part of the area in the track which is where Kierans was about to start rapping when he says 'thinking' and it has that 'Ck' bit but I think that is because of the reverb tail so it's supposed to be there.
Afterwards I bounced the audio file and did a before & After... As you can see... (The picture blow)
The first picture is the before and the second picture is the after.
For the final stage I then added a limiter, boosted the limiter to +9.5dB and the release time to 15.0ms.

EP - 02. Lost Love (Feat Caitlyn Scarlett)
Again this track was already limited and mastered so it was also difficult to re-master it...
However
In this track, the mix was really good however I had to make a slight adjustments. The Claps were really really really sharp and there was many spikes because of it, also the kick had many spikes too. I had to EQ and add a high past filter around 40 Hz, afterwards I Eq'ed out around 2.1k Hz which is where most of the Claps were coming from, I had to turn it down by -3.5dB. After that I added the Multi pressor, so I can just compress the high frequencies just a small amount but I mostly compressed around 2.1k Hz which helped the claps to make it less sharp. 
Here's the Before and after. 
As you can see in second photo (After photo) most of the spikes are still there, I managed to get rid of some spikes but because the claps were bright the mix it was quite difficult to make them less bright without affecting the whole track.
For the final stage I used a limiter. First of all I raised the gain to the highest point which was (+20dB) and decreased the output level to -10db. I did this because this helped me to deal with the release time, which I slowly raised... I raised it to 16ms which was a good set point. It was neither too relaxed or too tight which was good. Afterwards I put the output level back to 0dB and started over with the gain, I raised the gain to +9.5dB.

Friday, 4 April 2014

Production Diary Two. Uriel - You.

Uriel - You.
Well with this track compared to the stuck in the dream one is very different. The style of this track is also Dark but it's Dark RnB more likely to  be contemporary/Ambient. With this track I made the instrumental first. This instrumental was actually featured on my instrumental mixtape 'The Keys'. There is loads of influences in this instrumental coming from artists like Jhene Aiko for example. She is a singer who sings on a lot of RnB but more of that ambient/contemporary type of RnB.
The singer who was singing on my instrumental is actually an American singer from overseas (New York).

Equipment
The only equipment I used was the Midi Keyboard. Everything I did was on Midi, I decided to use this because I am more familiar and comfortable in using.

Making of the instrumental (The important things)
I used a lot of Pads for this track. The pads on the track are the ones that actually make the track since they are the main elements that complete this song. I used pads from the logic library (EXS24) but I did a lot of processing into them. I used the filter in the EXS24 (cutoff) and turn it down for a low pass effect this made my pads more warm and dark which is what I wanted. 
The notes that I used to make this track are not really chords it's just 3-4 notes throughout the whole song., but there some changes as the song progresses. These changes are caused by the pads I used. I used about 7 pads.
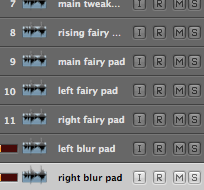
The reason why I used 7 pads is because, I hard panned these pads so that one is on the left while the other one is on the right However not all of them are hard panned. Only 6 of them are hard panned. The first Pad is panned to the left while the second one is panned to the right but it's not really hard panned it's panned to about 15 - 35 degrees. The 'main fairy pad' is the middle pad so it's not panned either to the left or right. The ones underneath that pad are the ones which are hard panned to the left/right. The 'rising fairy pad' is the pad that makes an awkward sound when played. I automated it by raising the low shelve so that the quality of the sound could pop out more but this was only used in the intro as a little drop, just before the instrumental comes in. It is however also used in the chorus.

The kicks I used are the drums that I made by using 2 drums from the logic library and processing them. These kicks are heavily compressed, but for kicks I used different circuit types. One is VCA which I used on the actual channel fader. VCA stands for Voltage Control Amplifier. The VCA circuit was used to make the kicks pop out more and to make it a bit more fat. I then sent a bus for another compressor but this time I used the circuit type FET. FET stands for Field Effect Transistors. I used FET circuit type to give the kick a nice punch.
The snare I used is not actually a snare it's more like a Rim Shot and it's from the Logic library. I EQ'ed it a lot to get that sound and I added a stereo Delay so when It's been hit the delay would go the right of the speaker, but it would then bounce back to the left of the speaker. The filter was also used so it's not too bright, I was looking for a Dark RnB sound so the filter created a low pass effect upon the stereo delay.

The bells are the only melody that's played through in the chorus, these bells are from the logic library kit, except they just sound a bit more warmer and thinner. This is because I EQ'ed around 1k Hz and turned it down by about - 3 - - 6 dB. I did this because the bells were very very sharp and bright.  There's 2 bells. One bell is being played in left side of the speaker while the other is being played in the right side of the speaker however the difference between this is that they both play different melodies.

Chopped vox?? As you can see there's a chopped vocals that I used for the chorus so the listener's would know that it's the chorus but it's turned down so it didn't clash with the main vocals. I got from vocal from Youtube. The vocal is actually Mary J blidge. The only difference is that I reversed it and added Averb.

The guitar? Now the guitar that I used is from the logic library and I didn't do that much for the guitar because I didn't have an idea what needed to be done. When I showed my friend producer the track he could already tell that that guitar was fake, I didn't really decide on getting real live guitars for this but it would've sounded much better if I did use live guitars.

Vocals.
The vocals are from Singer and Song writeR Uriel who lives in New York, she wrote all of the lyrics when I sent this instrumental to her manager. This is obviously a free instrumental since it appeared in my Mixtape so they had the rights to use it, as I also gave them permission to.

My Mixing & Mastering
As you can see for the same as the other's I mixed every instrument low again. 
I mixed the pads kind of equal so they have the same volume. Certain Instruments level are quite low for example the bells, I didn't really want them to be that noticeable. The kicks, clap (not the rimshot) and the pads are mainly the loudest in my mixing. I Eq'ed every instrument individually, as you can see I am kind of mixed it the same as the track 'Stuck in my dreams'. As apart of the mixing I didn't mix the vocals! (unfortunately).

Engineer's mixing & Mastering
When the Engineer mixed the track, he used pro tools to mix it. He made a lot of things loud, the loudest point of the track was the vocals but it also it was the Rim shot. I think in his eye he wanted the rim shot to be one of the main elements as the same for the vocals. The only thing he did which was quite odd was that he turned down the chopped vocals that was used in the chorus, but I think he did this because he didn't want it to clash with the main vocals.
For the vocals he used a AKG C1414 microphone, as you can see this type of microphone is really popular. The C414 produces a nice clean quality when recording with it, it's really crisp as well. 

I can hear that he did some effects on the vocals, with the deep voice in the chorus and the rewind effect as well. I personally think that it was really effective and interesting. Also I think that he boosted around 1.5k Hz for the air of the vocal but not that much which was really good. 

The whole mix of the song is really good nothing is too loud besides the rim shot but it doesn't clash with the rim shot.


Thursday, 3 April 2014

Production Diary Three. T.Y.C - Over & Over

T.Y.C - Over & Over.
This track isn't really a dark type of track it is only a little bit. This is actually more of an old school type of track. This instrumental was also made for my mixtape 'The Keys'. The rapper T.Y.C is a rapper from London. I sent him this instrumental so he could produce this track. This track is called Bring Back The Old School the concept of this track is about his memories and the past (1996) times.

Equipment

The mic that was used for the vocals was the Audio Technica 2020. The advantages are its cheap. It Doesn't pick up much noise. Also It has decent quality. There's not really many advantages, Disadvantages when recording singers who are quite loud and at a close proximity the mic distorts a lot. It doesnt pick up lows well makes the vocal sound hallow it has a built in high end boost which can sometimes ruin the vocals. Comparing this to the C414, I would probably use the C414 only because the quality out of C414 is so much better, if you have a loud singer it wouldn't damage the microphone or cause any harm upon the mix however the Audio Technica has a build in high end boost which is not really good.

I used the M-Audio Midi keyboard for this production, as everything is midi and there is no live Instruments contained in this track.


The making of the Instrumental

The main elements of this track are the samples and the vocals.

I used a sample called 'Feel the fire' and chopped it up, then took away the parts I didn't like. One of the parts I used sounds like strings being chopped while the other one is a guitar. The instrumental is quite repetitive since it's an old school type of track. I used a 'Stereo Delay' on the sample to cause an echo effect but you can't hear it that much, I also used Reverb on it as well.
In the chorus I reversed a certain part of the vocal and added a pitch shifter, to change the pitch. I did this because I want the sample to be that recognisable, I also added the 'feel the fire' sample into the chorus as well but it's also pitched.

The drums I used were the drums from the logic library, I EQ'ed one drum as the punch kick and then I layered the same kick but this time I made the kick have more bass. So I could have a punchy kick and a bass kick separate. But I did add distortion onto the bass kick as a bus. These kicks were also compressed but they weren't compressed that much and I did use the same circuit type as the one on my other track 'Uriel - You'.

The bass of the track is also there except it isn't that loud, it's a simple bass played with about 2/3 notes. I got the bass instrument from the Logic library kit also.

Mixing.
When I mixed the Instrumental I turned everything low and mixed each instrument differently, I made the samples and the drum beat to stand out more, since it's the main elements of the instrumental.

Mixing the Vocals.
Although the vocals were mixed, I didn't mix it alone, my other friend producer recorded the vocals first and mixed a bit of it first as well. Then he sent it over to me to finish mixing and mastering it. When I mixed the vocals I EQ'ed it so I took some of the high end off and raised 1.5dB to 250 Hz, I then added a bit of air around 1.5k Hz to 2.5dB. But since it's a rapper there wasn't that much to do, since the frequencies of his voice wasn't that hard to mix. For the chorus (of the track) I added a plug in called the chorus which doubled the vocal and made it a bit more stereo.

Mastering.
When I was mastering I could hear that kicks (The bass kick) was clashing with vocal a bit, so I Eq'ed the bass kick around 70-80 Hz to -5.0 dB, this whipped off the bass kick a bit but not much, which sounded really nice. Afterwards I compressed it by adding a multi pressor to balance the mix out, for the kicks, snare and the vocals they all needed to be balanced.
I sent a bus for the distortion the drive wasn't up that much it was raised to about 5.5 dB and the frequency was around 900 Hz.
Afterward I added the finishing touch the 'adaptive limiter'! This turned up the whole mix, I raised the input scale to about 5.4dB and the gain to 5.5 dB. Luckily nothing didn't distorted!

Production Diary one. Stuck in a dream.


StevieBbeatz - Stuck in a dream, recording!!
For this track, my idea was to go for something dark since It fits in with my genre I'm doing (Ambient/Contemporary/Dark RnB). I also decided that I wanted to do a composition/experimental type of track so it has no song structure, it's just something you can vibe too. I did use specific sounds to make it suit the genre such as synth pads, vocals, bass and more. I got some of these sounds from Logic HOWEVER many would not be able to notice that I got it from Logic, I did loads of tweaking. The sounds I tweaked is the electric keyboard, I took the treble off so it has that soothing sound on it and I added more of the bass to it. My track does not contain any live instruments it's all midi, I decided to do it in midi because using live instruments for a dark sound like this type of track... wouldn't of suit it in my personal opinion.

Many instruments are reversed in my track, the only why is because it gives it that contemporary feeling, I wanted to add a lot of influences to this track. Not only this is a Dark/Contemporary track but it also influences a hip hop type of track as well. The 'I'm Stuck in a dream' vocal suits it so well.

Equipment & sounds

To start of with, the Equipment I used to create this track, was my keyboard (Typing keyboard) and samples (My samples)! I made this at home, to mix and master I used my headphones.  I recorded the chords by playing it on my typing keyboard, I also did the hi hats on it as well.


Natural sounds: There is some natural sounds I used such as the rustling, the bottle cap, the beep and that helicopter sound.
I recorded 3 sounds using my phone and saved it as samples on to my computer, afterwards I tweaked it by using the EQ, Filter, echo and so on. One other sound ( The helicopter one ) was recorded using a  high quality recorder, that sound is actually a dryer in the bathroom. I also tweaked that. How I used it in this track is that I added the tremelo effect to make it go from left to right in the speaker/headphones.

Drum kits: I have my own drum kits that I made from a while ago, so I used them for this track. How I made the drum kits is that I took 2 drums from one of the logic kits, did some EQ, Overdrive, filter and then bounced it as a WAV file for high quality.
But in this track there is a bass drum that I tweaked, I used the Filter, Distortion and sent it to a bus for the pitch shifter effect on the drums, to give it that dark - bass type of sound. The pitch shifter created a huge impact upon the drums, this is because pitching drums down would give it more of a boomy type of drum, and you wouldn't even realise that it's been pitched down.


Reversing: I did many reversing on instruments. The instruments I reversed was the bass drum, to make it a bit more jumpy and to make it feel like it's moving back and forward. I reversed the claps, so the claps isn't so bright. I also reversed 2 or 3 vocals, to give it that dark feeling, which suits my genre. I reversed the bottle cap instrument and the 'helicopter' sound so I can confuse the listener's, they'll hear a bottle cap that's not reversed but they'll also be hearing a bottle cap is reversed - however they wouldn't realise that the bottle cap (reversed) is the same as the bottle cap(unreversed).

Vocals: I got the vocals from Logic's library. The 'Stuck in a dream' is also from the Logic library but I added some EQ, Distortion, Compressor and then sent a bus to a pitch shifter which made the vocal a bit deeper, dark and evil. I added loads of tone to the distortion (overdrive) though. I also sent a bus to a reverb, so the vocal doesn't sound subtle and dry.


Melody & chords:
I started with the chords first, the instrument I used was a piano but I changed it to a synth pad ( a logic one ) I did edit it though so that people wouldn't recognise the sound.
There's a flute that's reversed, the flute is reversed because it suits the track more, making it reversed makes the track a bit more dark. I didn't do that much on the melody & chords.
I did add a electric piano, you probably can't recognise it because I made it into my own sound and processed it a lot. I chopped it up and put the melody parts into different orders so for example the start of the sound would be last while the end part of the sound would be first. Something like this for example ALSO it is reversed! As you can see these chopped parts are in different orders. The wave form is not accurate is what I wanted.


Mixing and mastering.
This is how I mixed all of the instruments, I mixed them low first but I did turn some things a bit more up such as the claps, drums, vocals and the main melody (the electric piano). Before turning everything into audio, it was midi at first but I decided to mix it using audio because you get a higher quality. I mixed all of the instruments Individually none of them was in groups or anything like that or a bus. They were all mixed individually and it took a lot of time to mix them like how they are now. I didn't mix this track using the studio facility I used my headphones to mix this.

After I finished mixing the track I bounced it as a WAV file so that the quality isn't lost or compressed. 
How I mastered this is that I used the Hipass plug in because the kicks were a bit too bassey. 
I then used the EQ, around 85Hz I turnt it down to -3.5dB because the bass on the kick was a bit too much as well. The MultiPressor was also used to balance out the whole mix and push the kicks a bit more to make them stand out more through out the track. I then sent it to a bus for the distortion. Now, why did I do this? I did this because I wanted the mix to be a bit more FATTER but I did not turn up the bus volume that much only a little bit. The drive of the distortion was turned up to 10.5dB. After finishing all of that I added another EQ on the output and turned down around 85 Hz to -5.0dB, then I stuck a limiter on it and turn it up briefly.